
You have bought your intercom, and now comes the real question: how do you install it correctly? The good news is that installing an intercom is simpler than most people expect, especially once you know the right steps. Whether you are setting one up at home or in an office, a clean installation makes all the difference in performance and reliability.
This guide walks you through the complete setup for both wired and wireless intercoms, covers office installation, lists the common mistakes to avoid, and explains when it is wiser to call a professional.
Before You Start: What You Will Need
A little preparation makes the whole process smoother. Before you begin, gather these basics:
- The intercom set, which usually includes the outdoor unit and the indoor monitor
- A power supply or adapter for the units
- Mounting screws, wall plugs, and the right tools for drilling
- Cabling, if you are installing a wired model
- A UPS or battery for backup during load shedding
Open the box first and check that all parts and accessories are included before mounting anything. This small step saves you from surprises midway through the setup.
Wired vs Wireless: Choose Your Installation Type First
Your installation method depends entirely on the connection type of your intercom. A wired intercom needs cabling between the units and some drilling, which makes the setup a little more involved. A wireless intercom skips all the cabling and only needs pairing, so it is faster and cleaner to install.
If you have not chosen yet, compare the wired and wireless options before you begin, since it changes your whole setup process.
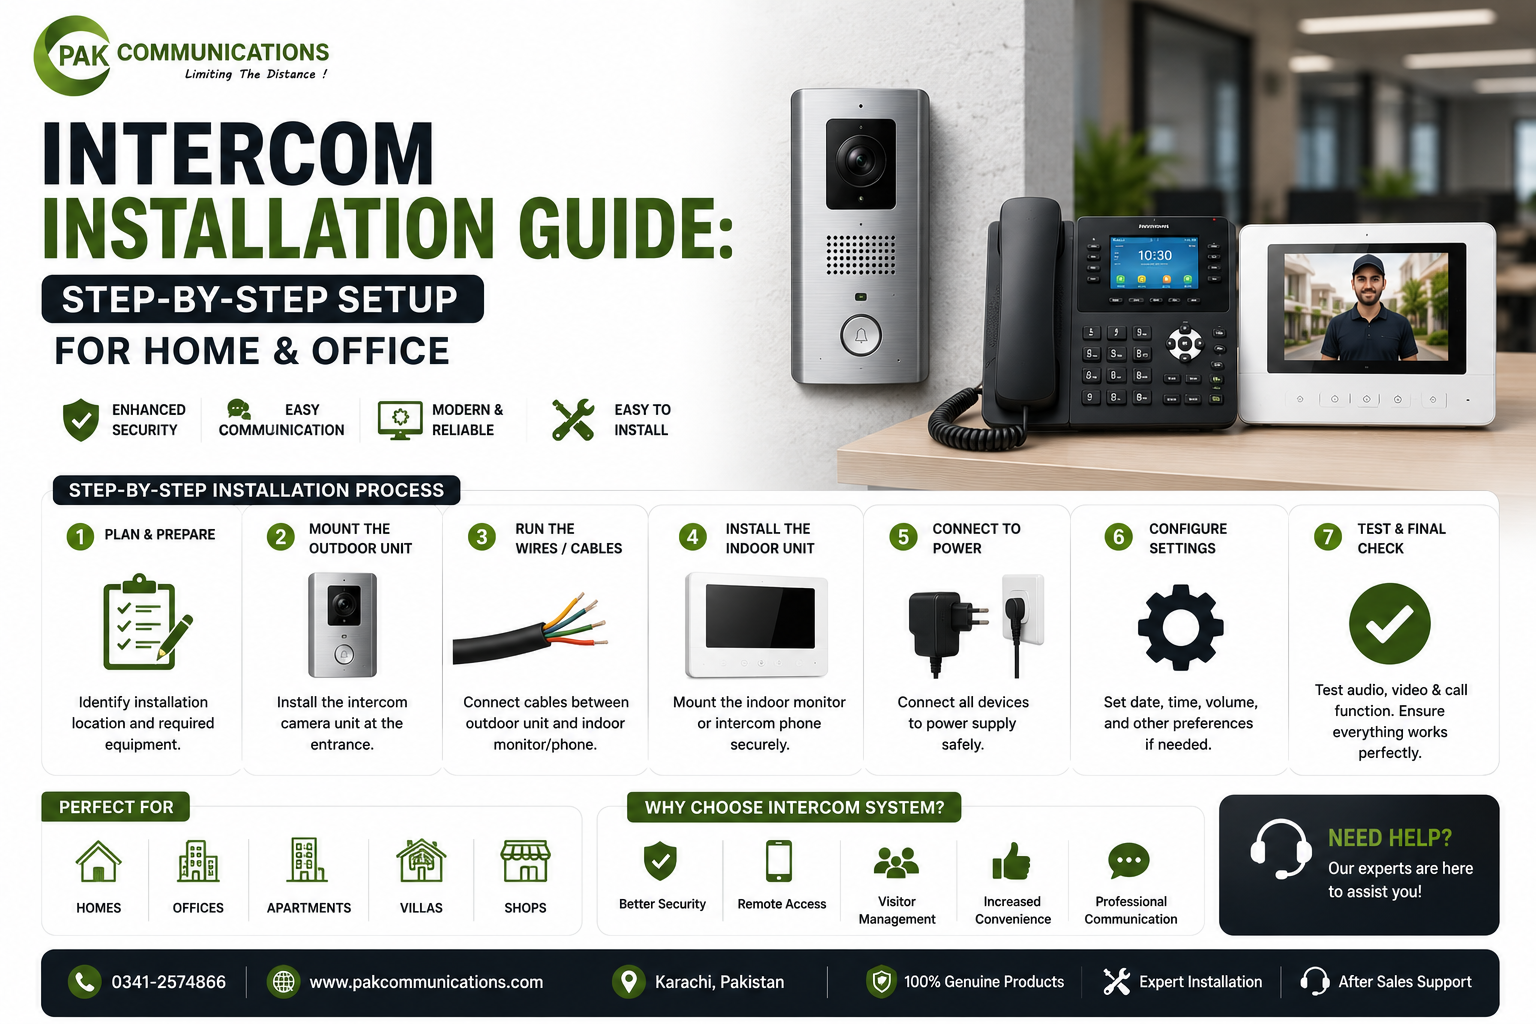
How to Install a Wired Intercom Step by Step
Follow these steps in order for a clean wired installation:
- Plan the cable route from the gate to the spot where the indoor monitor will sit.
- Mount the outdoor unit at eye level near the gate, ideally shaded from direct sunlight to avoid glare on the camera.
- Run and secure the cabling along the planned route, keeping it tidy and protected.
- Mount the indoor monitor on a convenient wall inside, such as the lounge or near the main entrance.
- Connect the wiring to both units and to the power supply.
- Connect the electric lock if you want gate release from inside, which is an optional step.
- Power on and test the call, audio, video, and lock release to confirm everything works.
How to Install a Wireless Intercom Step by Step
A wireless setup is quicker. Here is the process:
- Choose positions for the outdoor unit and indoor monitor, making sure they are within signal range of each other.
- Mount the outdoor unit at the gate at eye level.
- Place or mount the indoor monitor inside your home.
- Connect both units to power and to your UPS or battery backup.
- Pair the indoor and outdoor units by following the instructions in the manual.
- Test the call, audio, and video, and check that the signal stays strong through your walls.
Installing an Intercom in an Office
Office installation follows the same basics, with a few extra considerations. Offices often need multiple indoor units, so plan the placement carefully across the reception and cabins before mounting. Decide which unit connects to which point, and label the units clearly so staff know how to reach each department. For larger offices, mapping out the layout first prevents confusion later.
Common Intercom Installation Mistakes to Avoid
A few simple mistakes can hurt performance, so watch out for these:
- Placing the camera so it faces direct sunlight, which causes glare
- Mounting the outdoor unit too high or too low instead of at eye level
- Ignoring wall thickness, which weakens wireless signals between floors
- Skipping backup power, leaving the system dead during load shedding
- Leaving cabling loose or unprotected, which invites damage
- Not testing the full system before finishing the installation
How Much Does an Intercom Set Cost in Pakistan?
The cost of an intercom set depends on a few things, mainly whether it is audio or video, wired or wireless, and how many units are included in the set. A basic audio set sits at the affordable end, while video sets with cameras and larger screens cost more. Wireless and smart sets usually carry a slightly higher price than basic wired ones.
If you are still choosing your unit, you can compare the latest intercom set price in Pakistan on our intercom collection page.
When Should You Call a Professional?
While many intercoms are easy to install yourself, some situations are better handled by a professional. Long cable runs, electric lock integration, and multi-unit office setups all involve extra complexity. If you are unsure about wiring or want a guaranteed clean result, hiring a professional installer is worth it. A proper installation ensures your intercom performs reliably from the very first day.
Frequently Asked Questions
Can I install an intercom myself?
Yes, many intercoms are designed for simple self-installation, especially wireless models that only need pairing. Wired models with long cable runs or electric lock integration are more involved, so call a professional if you are unsure about the wiring.
How long does intercom installation take?
A basic wireless intercom can be installed in under an hour, since there is no cabling. A wired installation takes longer because of cable routing and mounting, and complex setups with multiple units or lock integration can take a few hours.
Where should the outdoor intercom unit be placed?
The outdoor unit should be mounted at eye level near the gate, so the camera captures visitors clearly. Choose a spot shaded from direct sunlight to avoid glare, and make sure it is protected from heavy rain for longer life.
Do I need an electrician to install an intercom?
Not always. Simple wireless and basic wired intercoms can often be installed without an electrician. However, if your setup involves electric lock integration or complex wiring, a professional ensures everything is connected safely and works correctly.
Can I install a wireless intercom without drilling?
In many cases, yes. Wireless indoor monitors can often be placed on a surface, and some outdoor units use adhesive or simple mounts. Drilling may still help secure the units firmly, but the cabling-free design makes wireless far easier than wired.
Conclusion
Installing an intercom is straightforward once you choose your connection type, follow the steps in order, and avoid the common mistakes. Wireless setups are quick and clean, wired setups offer rock-solid stability, and professional help is always there for complex jobs. Get the basics right, and your intercom will serve your home or office reliably for years.
Ready to get started? Explore our complete intercom system in Pakistan and pick the right set for your home or office.